Setting Up Your Business Page
Creating a business page on Facebook is essential in today’s digital age. With billions of active monthly users, Facebook provides an opportunity for businesses to connect with their target audience and market their product or service. Setting up a business page on Facebook is a straightforward process, and in this article, we will outline the steps required to get your business page up and running.
Step 1: Start by Logging into Facebook
To create a Facebook business page, you first need to have a personal Facebook account. If you don’t have one, create one. Once you’re logged in, you can start creating your business page.
Step 2: Choose a Page Category
After logging in, navigate to the Facebook homepage and select the “Create” button located in the top right-hand corner of the page. From there, you’ll be prompted to choose a page category. Select the “Business or Brand” category and then the corresponding sub-category that best describes your business.
Step 3: Fill out Your Business Information
After choosing your business category, you will be prompted to fill out your business information. This includes your business name, address, phone number, website, and a short description of your business (up to 155 characters). It’s important to fill out this information accurately as it will help potential customers find your business on Facebook.
Step 4: Add Images to Your Business Page
Once you have filled out your business information, it’s time to add images to your page. This includes a profile picture, which is the main image that will represent your business on Facebook. This is typically your company logo. You can also add a cover photo, which is a large image that stretches across the top of your page. This is a great opportunity to showcase your business and make a strong first impression on potential customers.
Step 5: Create Your First Post
After adding images to your page, it’s time to create your first post. This post will be displayed at the top of your business page, and it’s an excellent opportunity to introduce your business to the Facebook community. You can use this post to communicate your business’s mission statement or share a personal story about why you started your business.
Step 6: Invite Friends to Like Your Page
Once your page is set up, it’s time to invite your friends to like your page. This is a great way to get your page in front of people who know and support your business. Inviting friends is easy, and you can do it by clicking the “Invite Friends to Like This Page” button on your business page.
Step 7: Promote Your Page
To reach a wider audience, you can promote your page using Facebook’s advertising tools. This allows you to target specific demographics, interests, and locations to reach potential customers who are most likely to be interested in your business.
Creating a business page on Facebook is a powerful way to promote your brand and connect with potential customers. By following these simple steps, you can get your business page up and running in no time.
Navigating The List Feature in Facebook
Facebook is one of the most popular social media platforms, with over 2.7 billion active users. Managing your Facebook account can be overwhelming, especially when you are trying to keep track of your friends, family, and acquaintances in one place. The good news is that Facebook has a Lists feature that lets you curate your feed, making it easier to see posts from your favorite people, pages, and groups.
The Lists Feature in Facebook
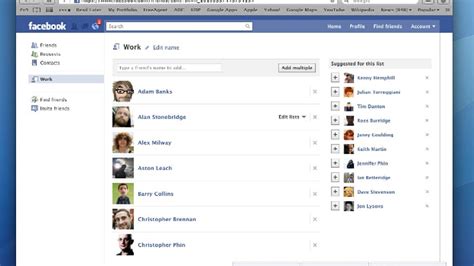
The Lists feature on Facebook allows you to categorize your friends, pages, and groups. This makes it easy for you to manage your newsfeed and see the most important posts from your favorite people, pages, or groups without scrolling through your entire timeline. You can create different lists for different needs, like a “Close Friends” list to see posts from your closest buddies, a “Work” list to stay updated on office news, or a “Funny” list to see memes and jokes.
To create a new Facebook List, follow these steps:
1. Go to your Facebook homepage and click on the “Explore” section on the left side of your screen.
2. Click on the “See More” button at the bottom of the page.
3. Scroll down and click on “Lists.”
4. Click on the “Create List” button.
5. Give your new list a name and choose people, pages, or groups you want to add.
6. Click on “Create.”
Your new list will now be added to the left-hand side of your Facebook homepage. You can click on the list to see all the posts from the people, pages, or groups you’ve added.
Saving Time with Custom Feeds
One of the coolest features of Facebook’s lists is that you can customize your feeds to show only the posts you want to see. This saves you a lot of time scrolling through posts you don’t want to see, making your Facebook experience more enjoyable.
To create a custom feed, follow these steps:
1. Click on the name of the list you want to customize.
2. Click on “Manage List.”
3. Click on “Choose Update Types.”
4. Choose which update types you want to see in your feed. You can choose from status updates, photos, links, videos, and more.
5. Click on “Save.”
Your customized feed will now only show the types of posts you selected.
Conclusion
Using Facebook’s lists feature can help you organize your feed and save you time. Creating custom feeds means you only see the posts you want to see, and categorizing your friends, pages, and groups will help you manage your social media presence. Now that you know how to navigate the lists feature in Facebook, you can enjoy a more personalized and streamlined Facebook experience.
Creating and Managing Custom Lists
Facebook has a plethora of features that make social networking effortless. However, Facebook Custom Lists is one of the most ingenious and underappreciated features that the platform provides to its users. Custom Lists allows users to categorize their friends into different groups and even limit aspects of their profiles from certain groups. In this article, we will detail out the process of creating and managing custom lists on Facebook.
Creating Custom Lists

To create a custom list on Facebook, follow these simple steps:
- Start by logging in to your Facebook account, and navigating to your profile page.
- On the left side of the page, look for the ‘Create List’ button, and click on it.
- When prompted to create a new list, give it a name, and start adding friends or pages to the list.
- Once you’ve added all the relevant friends or pages, click on the ‘Create’ button to finalize the list.
You can also create a custom list by navigating to your friends’ profiles and clicking on the ‘Friends’ button, and then adding them to a list. Additionally, when making a new post, you can select which lists can and cannot view that post.
Managing Custom Lists

Once you’ve created your custom lists, managing them is quite easy. Follow these steps to manage your custom lists on Facebook:
- Start by logging in to your Facebook account, and navigating to your profile page.
- On the left side of the page, select the ‘Friends’ tab, which will show your entire friends’ list.
- To the top right corner of the page, click on the ‘Manage List’ button, and select the ‘Edit List’ option from the dropdown menu.
- You can now remove or add friends and pages to your list directly from the edit list menu. Additionally, you can also give the list a new name or change the privacy settings of your list. After making any necessary changes, click on ‘Save List’ to finalize your edits.
By default, every custom list that you create on Facebook, has its privacy settings set to Friends only. You have the option to change this privacy default for each custom list. To do so, look for the ‘Privacy’ option located at the bottom of the ‘Edit List’ menu. Click on ‘Change Privacy’, and choose your preferred privacy setting for the custom list. You can choose to make it public, visible only to specific friends, or visible to just you.
Conclusion
Facebook Custom lists is an innovative way to manage your online interactions with your friends and pages. It is an excellent tool for managing different groups of people in your life allowing you to connect with them on various levels. Creating and managing custom lists is incredibly easy and provides an added level of privacy and control to your Facebook experience. So take the time and customize your lists and start enjoying the benefits today!
Best Practices For Maintaining Your Lists
Creating lists in Facebook is an effective way to organize your friends according to specific categories. This feature enables you to choose who sees your posts and updates. However, there are a few best practices to follow to ensure that your lists are maintained properly.
1. Review And Update Your Lists Regularly
It is essential to review your lists periodically to ensure that each person is assigned to the correct group. People’s interests and activities change over time, and it might be necessary to update your lists accordingly. For example, if you created a group of people who are interested in soccer, but now some of them have lost interest in the sport, you can remove them from that list.
Reviewing your lists regularly also enables you to identify inactive accounts or fake profiles that might have been added to your list. This ensures that your updates are only visible to genuine accounts that are relevant to the specific list.
2. Keep Your Lists Confidential
When creating and updating a list, ensure that it is kept confidential. Do not add people to lists that they wouldn’t want to be on, and do not disclose the name of the list to anyone not on it. This helps to maintain your privacy and that of those on your lists.
3. Customize List Visibility Settings
When posting an update or photo, you can choose who sees it. You can select to post it to a specific list or exclude a list from seeing it. You can also choose to make specific posts visible to only a few friends within the list. Customizing visibility settings ensures that your posts are seen by the right audience, and it helps to avoid unwanted communication with people who shouldn’t be seeing the post.
4. Avoid Overcrowding Your Lists
Creating a list with too many people can cause confusion, and it’s not practical to communicate effectively with such a large group. Avoid including everyone in one general list, and consider dividing people up according to various factors such as relationship status, geographical location, and interests.
For example, if you have a lot of friends who are interested in music, you can create a separate list for people interested in different music genres, such as rock, jazz, or hip-hop. Creating smaller, more targeted lists makes it easier to communicate efficiently with each group and reduces the noise in your feed.
In conclusion, Facebook Lists are an excellent tool for organizing your friends and controlling what content they see. By following these best practices, you can maintain your lists effectively, ensuring that you communicate with the right audience and maintain your privacy and that of those on your list.
Utilizing Lists For Improved Social Media Marketing
If you’re a marketer on social media, you may have noticed a decline in organic reach, making it harder to communicate and keep up with your targeted audience. Fortunately, Facebook offers an excellent tool called “Lists” that allows you to break your audience down and communicate with them more efficiently. With lists, you can maintain, manage, and interact with specific segments of your audience in a streamlined manner.
Lists are ideal for business users who want to keep tabs on specific groups within their target audience, such as customers, suppliers, industry influencers, or even people in different demographics. This tool lets you nurture relationships among specific groups, keeping them engaged and interacting with your brand.
Lists are private, hidden from other users, and can be customized as per your preference – for instance, you can make them exclusive or allow your audience to join freely.
How to Create a Facebook List
Step 1 – Log in and go to your Facebook account. On the left side of your home page, you’ll see an option for “Friends.” Click on it, and when it expands, click on “More.”
Step 2 – Look for “Lists” and click on it. It will most likely be under the “Explore” tab.
Step 3 – Select “+ Create List” at the top right-hand corner.
Step 4 – Add a name for your list. You can name it anything that best identifies the group you want to keep updated.
Step 5 – Add a description if you deem it necessary – this is optional.
Step 6 – Choose profiles to add to your list. Start typing the based on your notations or preferences; each profile’s name will appear, and you can pick the one you want to list. Note: you can select up to a maximum of 5,000 profiles.
Step 7 – Click on “Create” once you’ve completed the above steps.
How to Engage Your List
Now that you’ve created a list, what’s next? Engagement, of course! This helps you to nurture your relationship with your audience, increase your posts’ visibility, and even grow potential leads.
You can engage your list through the following:
- Create engaging posts tailored to your list: Avoid advertising posts that come off as ordinary and do not connect to your audience. Instead, develop content that resonates with them. Try creating polls, asking questions, or even seasonal messages to help them connect to your brand.
- Comment and reply to your List members: Always monitor your lists and make sure that you keep up with the replies and comments from your members. This shows that you’re available and accessible to them; this will help keep communication channels open.
- Tag your List: Tagging is an excellent way to grab the attention of your targeted audience. And if you’re exclusive about tagging, you’ll grab their attention faster and effectively.
- Host Live Q&A Sessions: Hosting live Q&A sessions with your list is a creative way to nurture your brand’s relationship. It helps build trust and connect with your audience in real-time.
Conclusion
Failing to classify your audience, communicate, and nurture relationships can lead to losing your brand’s grip on social media. The Facebook Lists feature is here to improve your marketing techniques by breaking down your audience, managing your engagement, and, ultimately, helping grow your leads and build brand trust. Make Facebook Lists your go-to social media marketing tool, and watch your business grow at an extraordinary rate!
Breaking Up: How to Exit a Business Partnership

What Is The Primary Function Of Rna
