Accessing Your Shopify Settings

Shopify is a great e-commerce platform that offers a range of features to build and manage an online store. One crucial aspect of managing an online store is handling the financial aspect of the business. It is important to ensure that your bank account details are updated and accurate, so all payments are received securely and on time. In this article, we will cover how to change bank account details on Shopify.
Accessing your Shopify settings is the first step in updating your bank account details. Here is a step-by-step guide on how to do it:
- Log in to your Shopify account.
- Select the “Settings” button.
- Select the “Payment Providers” tab.
- Select the “Edit” button under the Payment Provider you use.
- Update your Bank Account Details.
- Save changes.
To access your Shopify account, visit the Shopify website and click on the “Log in” button on the top right-hand side of the page. Enter your email address and password, then click on the “Log in” button.
Once you have successfully logged in, you will be directed to the main dashboard of your Shopify account. On the bottom left-hand side of the page, you will see a vertical tab menu. One of the options in this menu is “Settings”. Click on it to proceed to the next step.
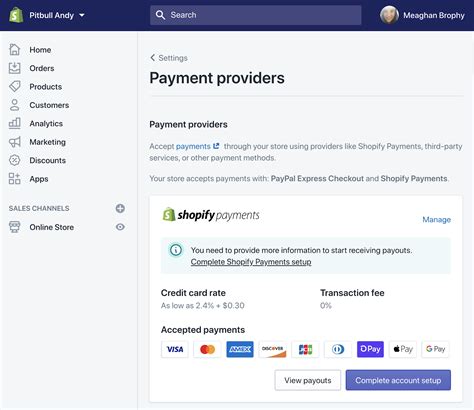
After you have entered the Shopify “Settings” section, you will find a list of options on the left-hand side of the page. Under the “Settings” tab, you will find the “Payment Providers” option. Select it to proceed to the next step.
Here, you will see a list of the payment methods that are available for your Shopify store. If you are using a third-party payment provider, such as PayPal or Stripe, select the “Edit” button that appears next to the payment provider you are using.
Once you select the “Edit” button, you will be directed to a page where you can edit the bank account details associated with your store. Enter your new bank account details and ensure that all the details provided are accurate. If there is any incorrect information, your payments may be delayed or rejected.
After you have entered all the correct and updated bank account details, ensure that you save the changes made. This is a crucial step in the process to ensure that the updates are saved and applied to your store.
Changing your bank account details on Shopify is a straightforward process that ensures that all payments are recorded and made securely. After following the above steps, you’ve successfully updated your bank account details in Shopify.
Navigating the Payment Providers Tab

If you’re running an online store, one of the things you’ll have to do is to set up payment options for your customers. Shopify makes this process easy with its Payment Providers tab. Changing your bank account details for payouts, updating your store payout schedule, and integrating with third-party payment providers are all possible through this tab. In this article, we will take a closer look at navigating the Payment Providers tab.
Accessing the Payment Providers Tab

To access the Payment Providers tab, log in to your Shopify account and click on the Settings option located in the bottom left corner of your dashboard. Once you’re in the Settings menu, you will see a list of options on the left-hand side of the page. Click on the Payments option to access the Payment Providers tab. If you haven’t already set up payment options, you will see a button that says Complete Shopify Payments account setup. Click on this button to get started.
Changing Bank Account Details

If you have Shopify Payments set up for your store, you can change your bank account details for payouts through the Payment Providers tab. To do this, click on the Manage option located under Shopify Payments. This will take you to another page where you can edit the bank account details and other payout settings. Once you’ve made the necessary changes, don’t forget to click on Save to update your settings.
Updating Your Store Payout Schedule

Another thing you can do through the Payment Providers tab is to update your store’s payout schedule. By default, Shopify will pay out your store’s earnings every 3 business days. However, you can change this to a daily or weekly schedule depending on your needs. To update your payout schedule, click on the Manage option under Shopify Payments and select the appropriate payout schedule under the Payout schedule section. Once you’re done, click on Save to update your settings.
Integrating with Third-Party Payment Providers

If you want to offer your customers more payment options, you can integrate with third-party payment providers through the Payment Providers tab. Shopify supports a wide variety of payment providers such as PayPal, Amazon Pay, and Klarna. To integrate with a third-party payment provider, click on the Choose alternative payment method option under the Third-party providers section. From there, select the payment provider you want to integrate with and follow the instructions to set it up. Once you’re done, your customers will see the new payment option at checkout.
Now that you know how to navigate the Payment Providers tab, you can set up payment options for your online store with ease. Whether you’re changing your bank account details, updating your payout schedule, or integrating with third-party payment providers, Shopify provides you with a simple and intuitive interface to get things done.
Removing Your Current Bank Account
If you want to change your Shopify store’s bank information for payouts, you must first remove the current bank account linked to your store. This process is relatively simple, but it’s essential to ensure that you have all the necessary information before proceeding.
Before you proceed with removing your current bank account, ensure that you have the correct login credentials (if applicable) for the bank account you want to remove. Shopify may require certain information such as bank account numbers, routing numbers, and other pertinent information in order to remove your current account.
The following steps outline the process for removing your bank account from your Shopify store:
- Log in to your Shopify account and select the Settings tab.
- Click Payments, and scroll down until you see the Payout section.
- Find the bank account you wish to remove and click the Trash icon to the right of the bank account details.
- Confirm that you wish to remove the bank account. This action will delete the bank account information from Shopify’s system and prevent any future payouts from being made to it.
It’s important to note that removing your bank account from Shopify’s system will not affect any previous payouts already processed. These payouts will be sent to the bank account as previously set up, and it’s your responsibility to ensure that you can access these funds through your bank account.
If you’re changing bank accounts to receive payouts, it’s crucial to ensure that you have updated your bank account information as soon as possible to avoid any delays in receiving future payments.
Always double-check your bank account information before submitting your updated information to Shopify’s system. Be sure to triple-check your bank information if you’ve previously made mistakes or inputted incorrect details. Any incorrect information may cause delays and missing any payments from Shopify to your bank account.
It’s also essential to check with your bank to ensure they can receive payments from Shopify. Many banks impose certain restrictions on third-party payments, which may affect the processing time or cause your payments to be rejected or returned.
Overall, changing your bank account information on Shopify is a straightforward process that can be completed within a few moments. Ensuring that you have the correct information is vital to avoid any delays or potential issues with receiving payouts from your Shopify store.
Adding a New Bank Account
Changing your bank account on Shopify is easy and straightforward. First, you need to add a new bank account to your store. This can be done by following the steps below:
- Log in to your Shopify Admin: The first step is to log in to your Shopify account and click on the “Settings” option located at the bottom left corner of the page.
- Select Payments: The next step is to select the “Payments” option from the settings menu. This will open a new page with the available payment options for your store, including the current bank account linked to your store.
- Add a New Bank Account: To add a new bank account, click on the “Add a bank account” button located at the bottom right corner of the page. This will open a new form where you will be required to input your new bank account details, including your bank name, account holder name, account number, and routing number.
- Verification and Activation: After filling in the required details, Shopify will verify your new bank account. Once verified, the account will be activated, and any sales made after that will be deposited into the new bank account.
It is important to note that Shopify takes security seriously, and as such, there is a waiting period of up to five business days before the new bank account becomes active. During this time, Shopify will review the new account details to ensure that they are valid and that there are no errors in the information provided. This waiting period is necessary to protect the store owner from fraud and to ensure that payments are made to the correct bank account.
Also, before adding a new bank account, it is advisable to inform your current bank account provider that you intend to switch to a new bank account to avoid any complications with ongoing transactions. This will ensure a smooth transition without any unnecessary delays.
In conclusion, changing your bank account on Shopify is a straightforward process that can be completed within a few minutes. By following the steps outlined above, you can add a new bank account and continue to receive payments from your customers without any interruptions. However, it is essential to take the necessary precautions and follow the required procedures to ensure a smooth and seamless transition from your old bank account to your new one.
Testing Your New Payment Provider
Once you’ve set up your new payment provider, it’s essential to test it to ensure it works smoothly for your customers. There are several ways you can do this.
1. Test on a Test Order or Draft Order
The easiest way to test your new payment provider is to create a test order or a draft order. This way, you can simulate a purchase and ensure that payment is processed correctly. You can create a test product with a low value, such as $0.01 or $0.05, and go through the checkout process to see if the payment is processed without any errors.
2. Test with a Real Order
You can also run a real order to test your payment provider. However, we recommend doing this only for small orders or orders that you would typically refund or cancel. This way, if there are any issues, you can quickly resolve them without causing any significant loss to your business.
3. Test with Multiple Payment Methods
If you plan to offer multiple payment methods, it’s essential to test them all to ensure they work correctly. This includes any third-party payment providers you may be using. Go through the checkout process with each payment method and ensure the payment is processed correctly.
4. Check for any Errors or Alerts
During the testing process, keep an eye out for any error messages or alerts that may appear. These could indicate issues with your payment provider or trouble with the checkout process overall. If you encounter any errors, contact your payment provider’s support team right away to resolve the issue.
5. Monitor Your Payment Processing
After you’ve tested your payment provider, it’s important to monitor its performance regularly. Keep an eye on payment processing times, the percentage of failed transactions, and any issues reported by customers. Regular monitoring can help you identify any issues quickly and resolve them before they become significant problems.
It’s also worth considering implementing fraud prevention measures such as Address Verification Service (AVS) and Card Verification Value (CVV) to further protect yourself and your customers.
In conclusion, testing your new payment provider is crucial to ensure your business runs smoothly and your customers have a seamless checkout experience. By following these tips, you can rest assured that your payment provider is working correctly, and any issues are resolved promptly.

Diagram Of Central And Peripheral Nervous System

What Blood Test Is For Kidney Function